VFX Elements
Using an intuitive node-editor, you can customize VFX Elements and Particle Systems

Judah Mantell
Last Update 2 years ago
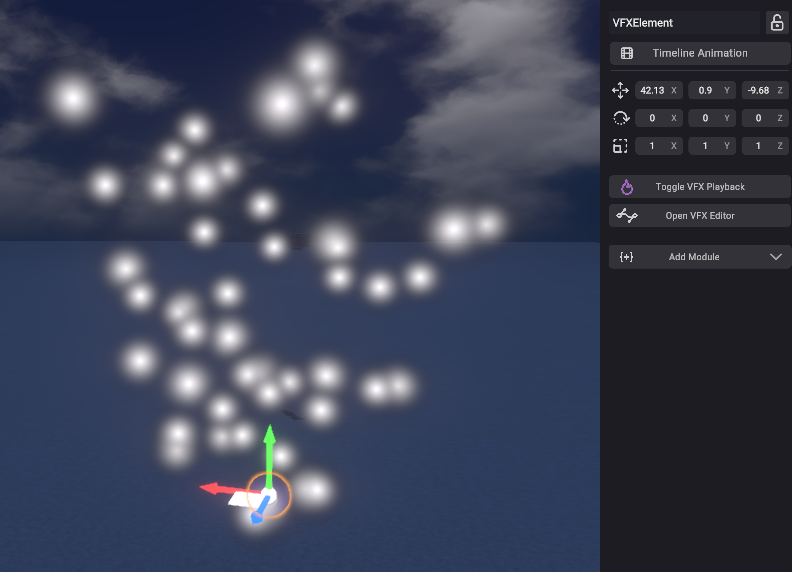
VFX Elements in SceneForge can be added to your scene using the create menu, and edited using the Node Editor window.
They have a variety of properties that will change the look of your element. These can be controlled using Nodes, which are explained below.
You can add VFX Elements like any other object using the Create Menu, under dynamics.
These objects have two options in their properties menu, aside from the usual:
| Toggle VFX Playback | Plays/Pauses the Looping Effect |
| Open VFX Editor | This opens up the VFX Editor Window. |

The VFX Editor
When the VFX Editor window is open, a wireframe gizmo will appear on the active effect showing the emitter volume. This shape/volume will change depending on what you configure in the menu.

The master node (shown above) has two main properties, and then category slots for different "modules" that can be applied to the VFX Element.
The default effect that is playing when the graph is empty is mainly for illustrative purposes, and its properties will be overridden when you add data to the Master Node.
The master node's inputs are as follows:
| Input Name | Input Description |
|---|---|
| Particle Lifetime | Controls how long each particle lasts in seconds. Takes in a value. |
| Spawn Rate | Controls how many particles spawn per second. Takes in a value. |
| Motion | Attach a Motion Node here for controlling the effect's motion. |
| Volume | Attach a Volume Node here to control the size and shape of the effect independent of the object's scale. |
| Visuals | Attach a Visuals Node here to control how the effect looks. |
| Forces | Attach a Forces Node here to control the physics forces on the effect. |
| Noise | Attach a Noise Node here to control the noise affecting the effect. |
| Lighting | Attach a Lighting Node here to control the effect's lighting. |
VFX Element Nodes
The VFX Element Editor has various nodes that are specific to editing VFX.
They are broken up into different categories inside the Add Node Menu.
| Category | Description |
|---|---|
| Core | These are core modules that go into the Master Node Slots. |
| Math | These are nodes relating to value manipulation and input/output. |
| Graphics | These are nodes relating to the visuals of a VFX Element. |
| Volumes | These are different volume shapes that can be applied to the VFX Element. |
In addition to the Math nodes that are always available,
the available nodes for VFX Editing are as follows:
| Node | Description | Inputs | Outputs |
|---|---|---|---|
| Visuals | Controls Inputs for the Element's Visuals. | Texture, Color/Gradient, Value | Visuals |
| Motion | Controls inputs for the Element's Movement. | Value/Range, Value/Range, Value/Range | Motion |
| Forces | Controls the Element's Forces | Value/Range, Vector3 | Forces |
| Noise | Controls random noise applied to the Effect. | Value, Value/Range, Vector3 | Noise |
| Lighting | Controls the lighting of the effect | Color, Value, Value | Lighting |
| - - - - - - | |||
| Color | Controls a specified color. | N/A | Color |
| Gradient | Controls a specified gradient. | N/A | Gradient |
| Texture | Sets a specified texture. | Set Texture, Flipbook | Texture |
| Flipbook | Configures a texture sheet animation. | X (Value), Y (Value), FPS (Value) | Flipbook |
| - - - - - - | |||
| Cone | Sets a 3D Cone Volume | N/A | Volume |
| Sphere | Sets a 3D Sphere Volume | N/A | Volume |
| Box | Sets a 3D Box Volume | Vector3 Size | Volume |
*More nodes are being added with every update.
As you design your VFX Element, the effect will auto-update in the scene view.
By default, the effect will require all existing particles to die out before changes are visible. This results in a more seamless editing experience.
But, if you would like the changes to be reflected instantly, you can toggle Auto-Refresh using the toggle in the window's menu bar.

To save your graph, you can manually click save, or it will automatically save when you close the window.
Was this article helpful?
That’s Great!
Thank you for your feedback
Sorry! We couldn't be helpful
Thank you for your feedback
Feedback sent
We appreciate your effort and will try to fix the article